


Creating a powerful and professional eCommerce website doesn’t have to be complicated or expensive and this blog actually worked. It’s not just theory or a general overview. This is a real, step-by-step guide that anyone can follow to manually create a WordPress website using cPanel. It’s based on a real working process, written in simple language, so even beginners with no coding background can understand and apply it easily.
Manual installation via cPanel gives you complete control over your website setup. Unlike automated one-click installers, this process allows you to understand how your site is structured, making it easier to manage and troubleshoot in the future. It begins by downloading the latest version of WordPress from the official site, uploading it to your hosting account using the cPanel File Manager and creating a dedicated MySQL database to store your site’s content and settings.
Once WordPress files are uploaded and configured correctly, accessing your domain in a browser triggers the setup wizard, where you define your site’s title, admin login credentials, and essential configuration. This is followed by logging into the WordPress dashboard, the central control panel where you manage your entire store.
To turn the basic WordPress site into a fully functional eCommerce store, the next step is installing WooCommerce. This plugin enables core features like product listings, cart and checkout pages, order management, and payment gateways. You can add your products, set prices, upload images, define shipping options, and enable multiple payment methods like PayPal, Stripe, or Cash on Delivery all from one dashboard.
To enhance the design and user experience, users can install a WooCommerce-compatible theme such as Astra, Storefront, or OceanWP. These themes are responsive, meaning your site will look good on mobile and desktop devices. You can customize everything from fonts and colors to headers and menus using the WordPress Customizer or a visual page builder like Elementor.
Security and performance are crucial, especially for online stores handling customer data and payments. This setup includes installing essential plugins like Wordfence (for security), LiteSpeed Cache (for performance), and Rank Math SEO (for visibility on search engines). Regular updates, backups, and SSL certification are recommended for long-term success.
In summary, building a WordPress eCommerce website manually through cPanel is a practical and rewarding process. It offers more flexibility than automated tools and teaches you valuable skills about website management. Whether you’re a small business owner, freelancer, or someone planning to launch their own product line, this method equips you with everything needed to set up and run a reliable, secure, and scalable online store all without needing to hire a developer.
If you’re looking to save time or need help with setup, you can also consider professional WordPress eCommerce services that handle the entire process from domain configuration and WooCommerce setup to speed optimization and SEO readiness so you can focus on growing your business.
Best eCommerce Website Ideas For
- Fashion & Apparel
- Footwear
- Food & Grocery
- Home Decor & Furniture
- Tools & Hardware
- Electronics & Gadgets
- Beauty & Personal Care
- Baby Products
- Pet Supplies
- Office & Stationery
- Travel & Outdoor
- Health & Fitness
- Watches & Accessories
- Gardening & Outdoor Decor
- Cleaning & Household Essentials
- Toys & Games
- Mobile & Accessories
- Automotive Parts & Accessories
- Kitchen & Dining
- Books & Media
- Sports & Fitness Equipment
- Industrial & Scientific Supplies
- Jewelry & Accessories
- Computer & IT Products
- Art & Craft Supplies
Step 1: Choose a Domain Name and Hosting
To get started, you need two things:
A domain name (e.g., www.yourstore.com)
A web hosting service
Recommended Hosting And Domain Providers:
Hosting Provider
- Bluehost (cPanel)
- BigRock+Hostgator (Recommended) (cPanel)
- SiteGround (cPanel)
- Hostinger (affordable and beginner-friendly) (hPanel)
- Cloudways (Recommended) (Dashboard)
Domain Provider
- Godaddy (Recommended)
- Namecheap
- BigRock
- Hostinger
Look for plans that include free SSL, 1-click WordPress install, and 24/7 support chat and call
Step 2: WordPress Installation Manually on your server
- Visit https://wordpress.org/download/
- Click “Download WordPress” (.zip file)
Note : You will need to upload its contents later.
1. Upload WordPress Files to Your Server
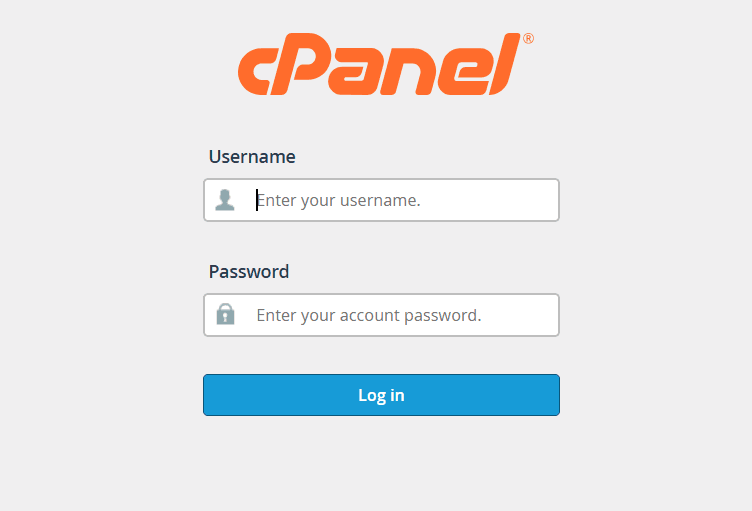
Log in to your cPanel (example.com/cpanel)
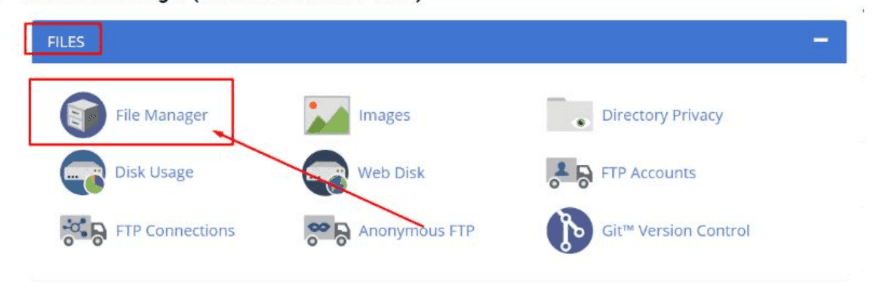
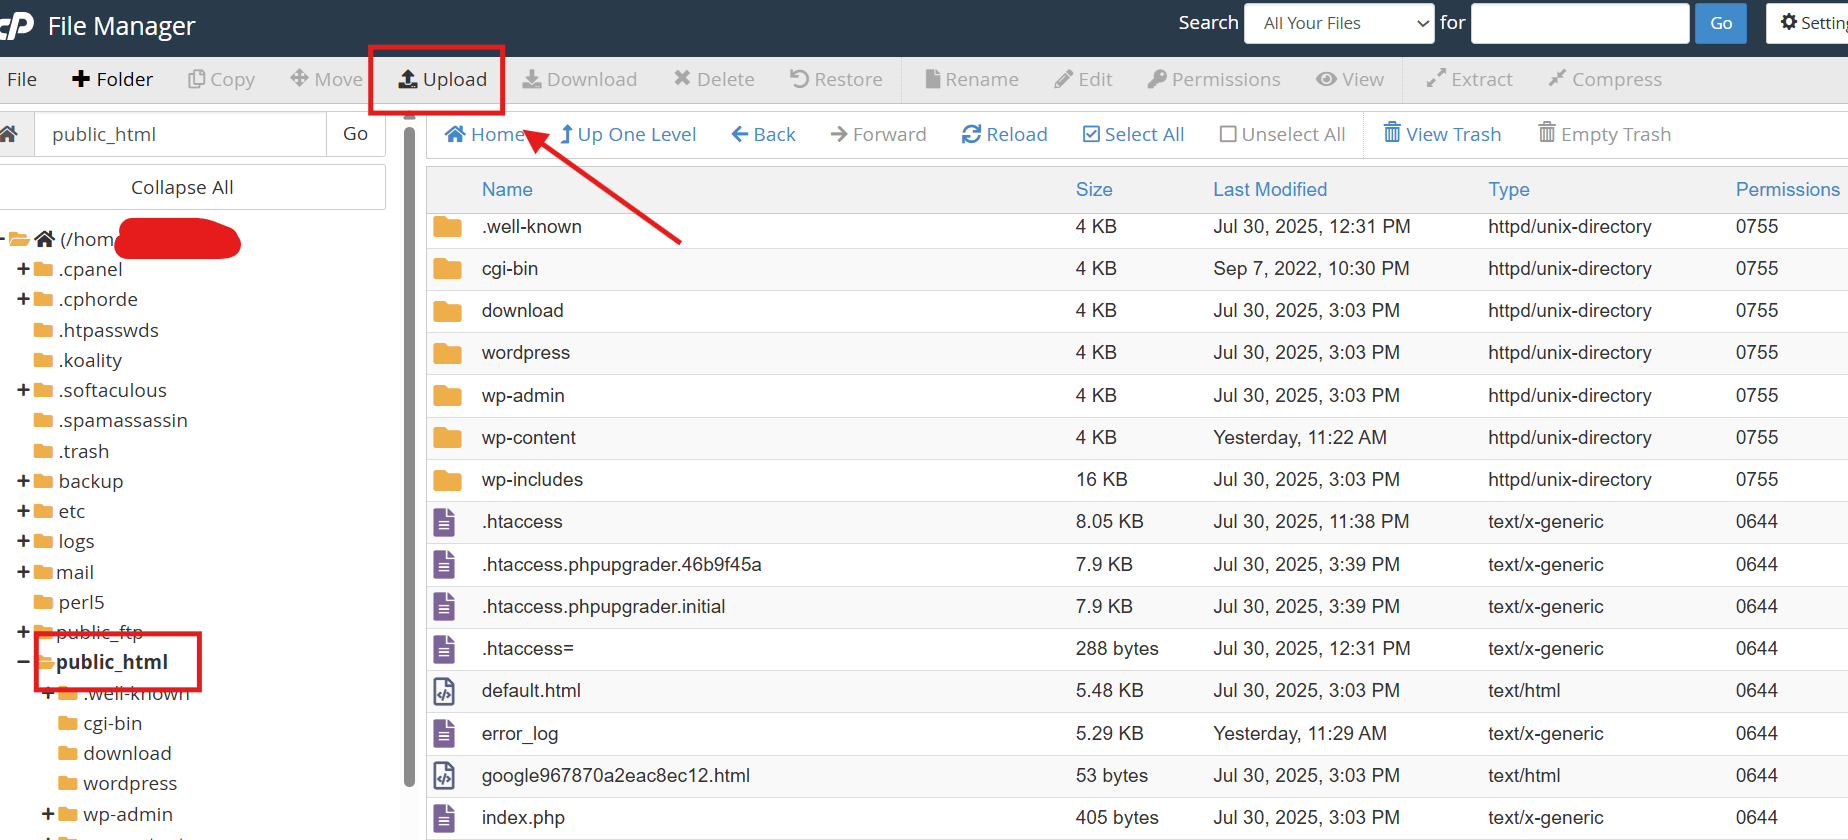
Go to File Manager.
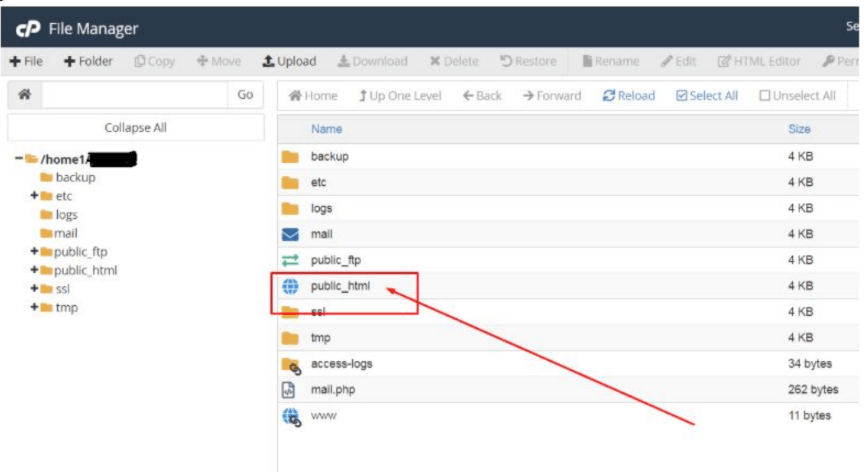
Navigate to the folder where you want to install WordPress (typically public_html).
Click Upload, then upload the WordPress .zip file.
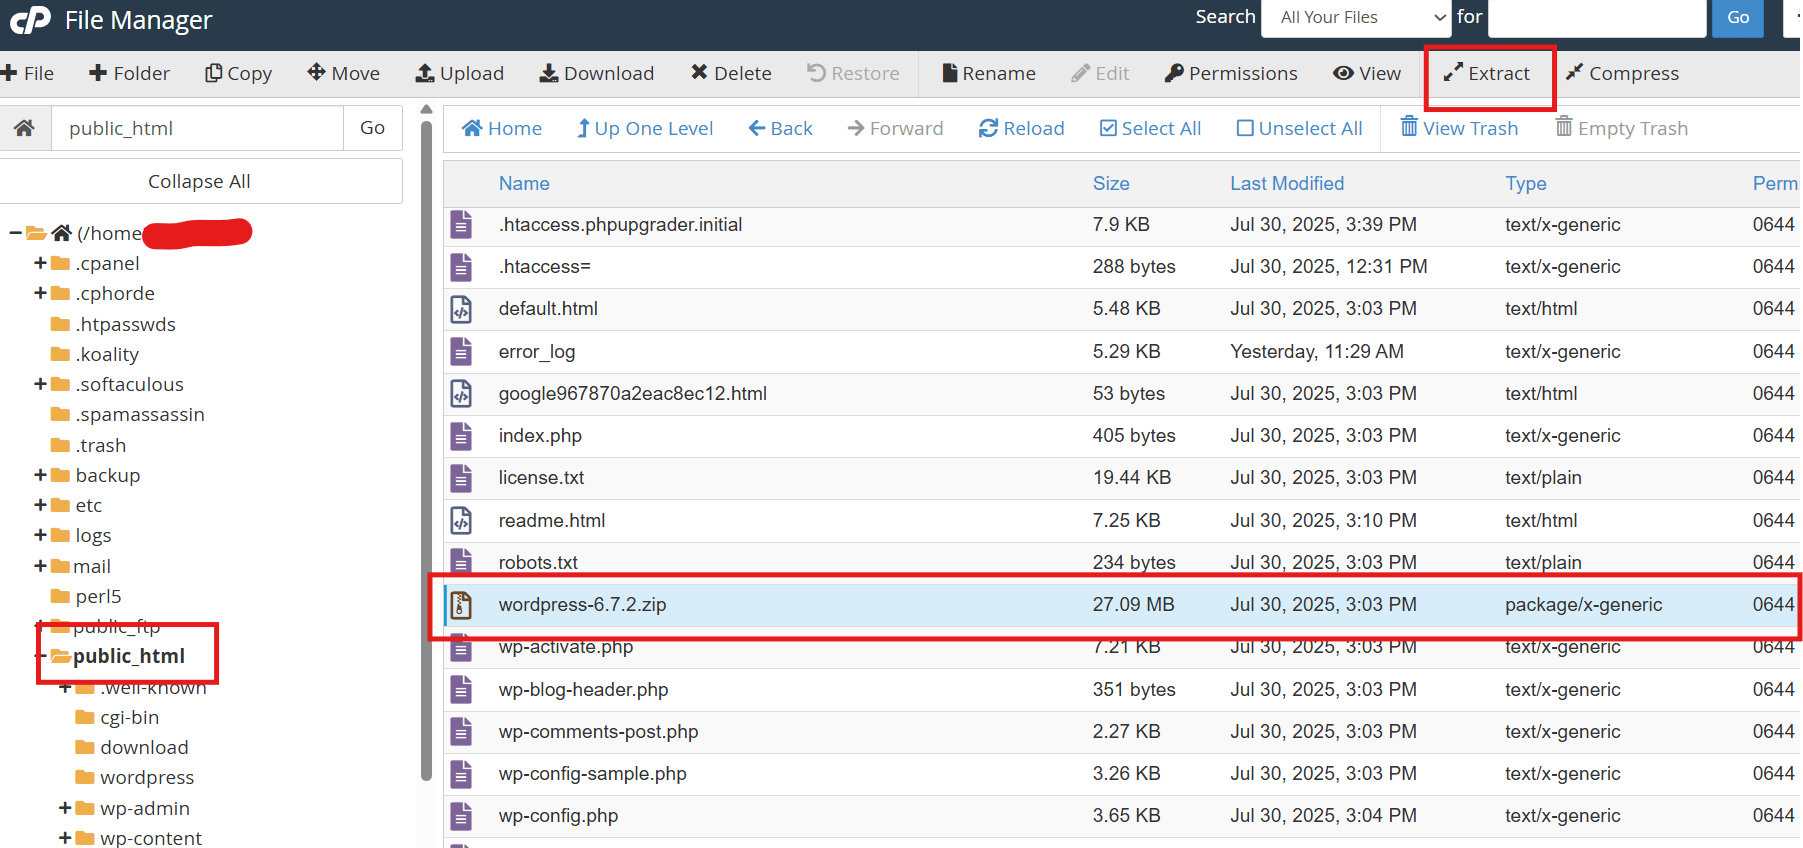
Once uploaded, extract the zip file in the same directory.
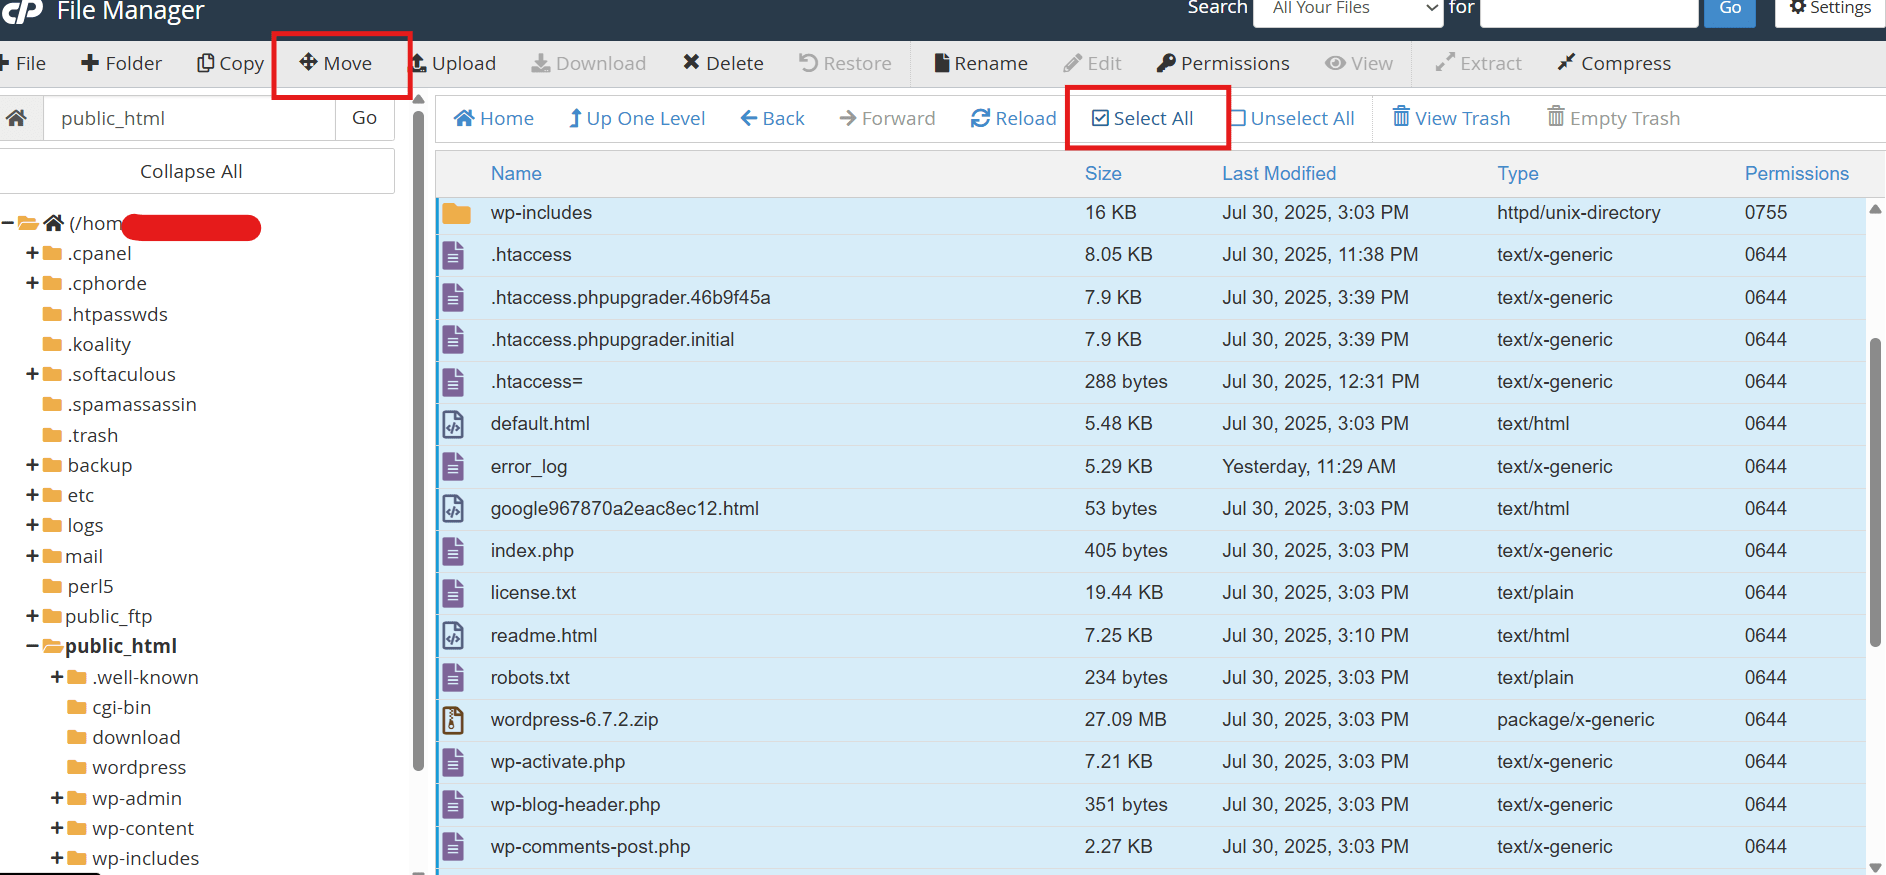
Then select all the file and move in public_html
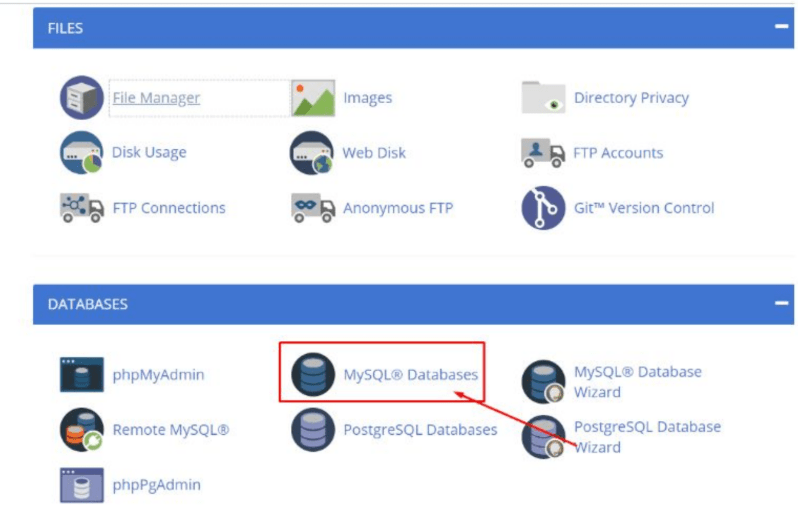
2. Create a MySQL Database and User
In cPanel, go to MySQL® Databases.
Under "Create New Database"
- Enter a name (e.g., myshop_db)
- Click Create Database

Scroll down to "MySQL Users"
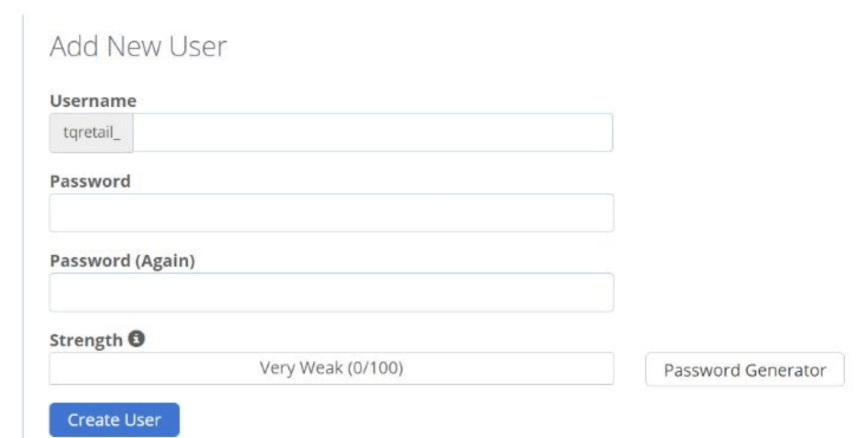
- Create a new user (e.g., wpuser) and password
- Click Create User
Under "Add User to Database":
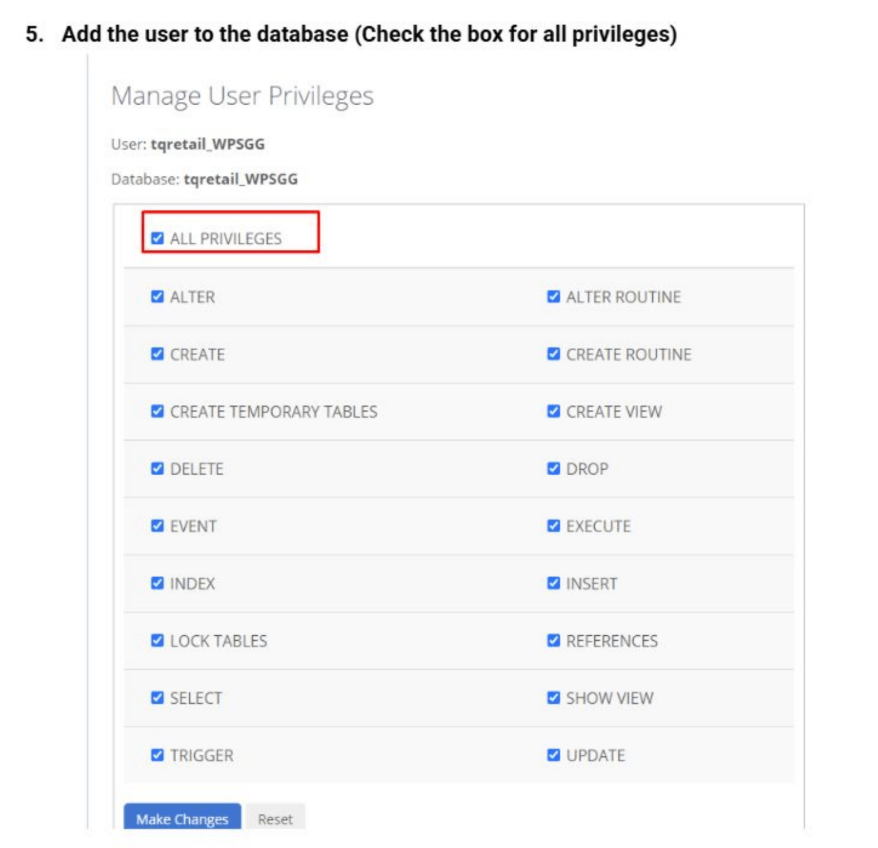
- Select the user and the database you just created
- Click Add
- Grant All Privileges, then click Make Changes
Keep note of:
- Database Name
- Username
- Password
Step 3: Run the WordPress Installation Script
Now open your browser and go to your domain:
https://yourdomain.com
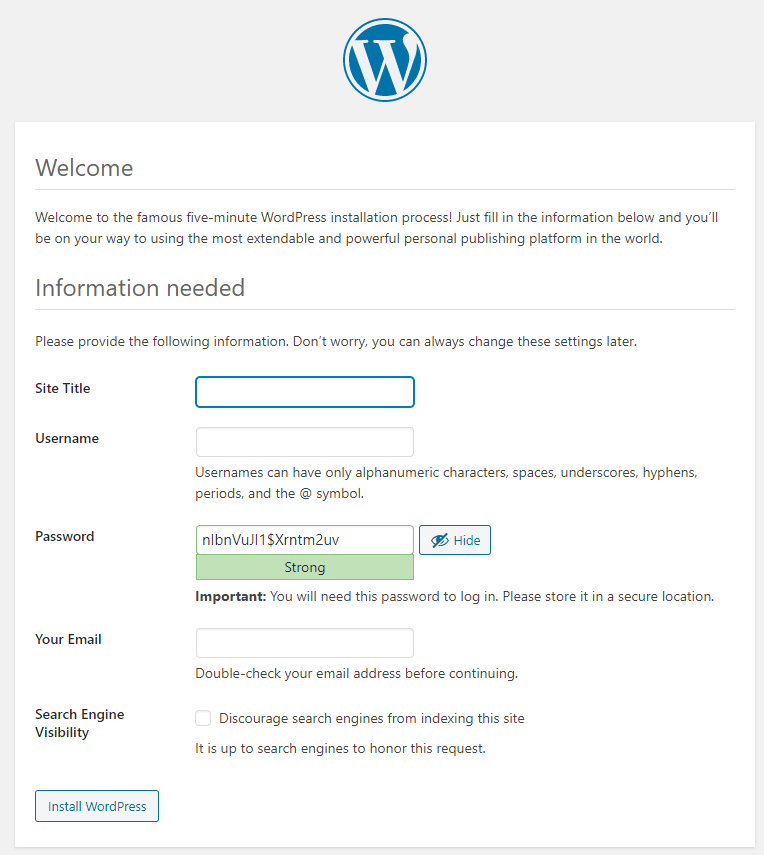
You should see the WordPress installation screen.
Complete the Installation:
- Choose your language and click Continue
- Enter:
- Site Title
- Admin Username
- Password
- Admin Email
- Click Install WordPress
Once complete, log in to your WordPress dashboard at:
https://yourdomain.com/wp-admin
NOTE:
Uncheck “Discourage search engines from indexing this site”
Step 4: Choose an eCommerce Theme
Free WooCommerce Themes:
- Astra
- Zakra
- Storefront (official WooCommerce theme)
- OceanWP
How to Install a Theme:
- Go to Appearance → Themes → Add New.
- Search and preview the theme you like.
- Click Install and Activate.
You can customize it using Appearance → Customize or with Elementor Page Builder.
You can customize it using Page → Edit Page or with Edit With Elementor.
Install WooCommerce (Without eCommerce Theme)
Now that WordPress is installed, let’s make it eCommerce-ready.
How to install WooCommerce:
- Log in to your WordPress dashboard
- Go to Plugins → Add New
- Search for “WooCommerce”
- Click Install Now, then Activate
Follow the WooCommerce setup wizard to configure:
- Currency
- Payment Methods
- Shipping
- Store address
Why WooCommerce?
- Free and open-source
- Supports physical and digital products
- Secure payment integrations (PayPal, Stripe, etc.)
- Scalable for small or large stores
Step 5: Add Your Products
With WooCommerce active, you’ll see a “Products” tab.
Steps how to Add a Product:
- Go to Products → Add New.
- Enter product name and description.
- Add product images.
- Set the price, inventory, and shipping options.
- Choose product categories and tags.
- Click Publish.
Repeat for each product
Step 6: Set Up Payment and Shipping
WooCommerce supports major gateways like:
- PayPal
- PayU
- Stripe
- Razorpay (for Indian users)
- Cash on Delivery (COD)
Setting Up Payments:
- Go to WooCommerce → Settings → Payments
- Enable your preferred method
- Enter account details and test the gateway
Step 7: Customize Your Store
- Use Elementor or Block Editor to design your homepage.
- Add About Us, Contact, and Policy pages.
- Install essential plugins for SEO, backups, security, etc.
Recommended Plugins:
- Rank Math or Yoast SEO – for search optimization
- UpdraftPlus – for automatic backups
- Wordfence – for security
- LiteSpeed Cache or WP Total Cache – for speed optimization
Step 8: Optimize for Mobile & Performance
More than 60% of shoppers use mobile devices.
Tips
- Use a responsive theme
- Compress images (use plugins like Smush)
- Use caching to load pages faster
Step 9: Launch Your Website
Before going live:
- Test product checkout and payments
- Make sure emails and confirmations are working
- Check on different devices and browsers
Then:
- Go to Settings → Reading
- Uncheck “Discourage search engines from indexing this site”
- Submit your sitemap to Google using Google Search Console
Step 10: Promote Your eCommerce Store
Launching is just the beginning — now it’s time to drive traffic and sales.
Promotion Ideas:
- Social Media Marketing: Promote products on Facebook, Instagram, Pinterest.
- Email Marketing: Use Mailchimp or MailPoet to build and send newsletters.
- Google Ads: Run shopping ads for product visibility.
- SEO Blogging: Write blog posts targeting keywords related to your products.
- Influencer Marketing: Collaborate with micro-influencers in your niche.
Final Thoughts
Creating a WordPress eCommerce site is no longer reserved for tech experts. With tools like WooCommerce, Astra, and Elementor, you can have your store online in just a few hours. Focus on clean design, strong product descriptions, and smooth navigation for the best user experience.
Launch Your WordPress Store with Expert Help
Let a professional do it for you!
Get a complete eCommerce WordPress store built for you — fast, secure, and SEO-ready.
Whether you sell handmade goods, digital downloads, or branded products, our WordPress eCommerce service has you covered.
Contact us today for a FREE consultation and discounted setup package!
M. +91-7827857576, Mail ID : simplegenesis.india@gmail.com